
Import & Export System
The ICE import and export functionality enables sharing of assets between different instances of ICE . This system allows for the transfer of Layers and Sessions, along with associated local assets such as image files, video files, and thumbnails.
Layer
Layer Export
Initiating Export
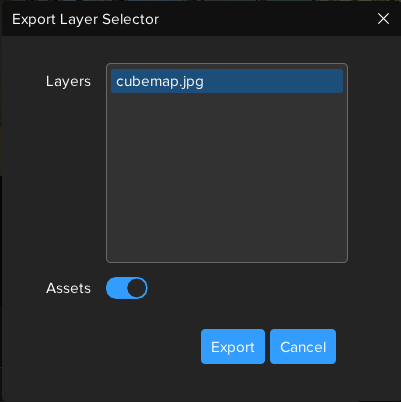
To export a layer, right-click on the desired layer in the Layer List panel. Select 'Export' to launch the layer export window, which presents layer export options.
Export Assets (Optional): Activating this option ensures that all related local files, including images and videos, are included in the export. They will be copied to the chosen export folder.
Choosing Export Location
Click 'Export' to bring up a file browser. Here, you can select your preferred export destination and name your file. Confirm your choices by clicking 'Save'.
Completion and Sharing
Post-export, a folder named after your file will be created. It contains the .iceLayer file and any associated assets. This folder is now ready to be shared with other systems for further use.
Layer Import
Initiating Import
Importing a layer into ICE can be accomplished through several methods.
Via Main Menu:
Access the desktop main menu.
Navigate to
Layer > Import Layer.Browse to locate the desired .iceLayer file.
Using Drag and Drop:
Simply drag the .iceLayer file from Windows Explorer.
Drop it into the ICE Layer List panel.
Through Double Click:
Double-click an .iceLayer file in Windows Explorer.
This action directly imports it into ICE.
Asset Handling
When importing a layer that has associated assets (like images or videos), these assets are imported into ICE using their existing file paths. It's crucial to store your layer folder in a logical and accessible location before importing to ensure smooth asset integration.
Post-Import Process
After the import is complete, ICE displays a dialog summarising the changes made during the import. This includes details of the layer and any associated assets that have been imported, allowing you to verify that the import process has completed successfully.
Session
Session Export

Exporting sessions in ICE is managed through the Export Session window. This feature can be accessed in two ways.
Accessing the Export Session Window
Via Main Menu:
Open the desktop main menu.
Navigate to
Session > Export Sessions.
Using Content Library:
Access the content library.
Right-click on the desired session to reveal the context menu.
Choose 'Export'.
Configuring Export in the Export Session Window
The Export Session window in ICE provides a variety of options to tailor your export process:
Session Export Options
Path:
Choose the destination folder for the export.
Sessions:
A list of selected sessions for export.
Add any sessions you want to export.
The system will identify any issues that need addressing before export. If found, you'll receive guidance on how to resolve them.
Assets:
Decide whether to export any associated assets such as images or videos along with with the currently selected session.
When replacing an existing exported session that included assets, an additional option, "Replace Existing Assets," becomes available. This allows you to decide whether to overwrite the assets during export or retain the existing ones.
Output:
Assign a name for the exported session file.
Initiating Export:
The 'Export' button becomes active once all potential issues are resolved.
Completion and Sharing
After the export is complete, ICE creates a folder for each exported session. This folder will contain the .iceSession file and a sub-folder with the session's associated assets. The folder is now prepared for sharing with other systems. If you exported multiple session you can share the parent folder containing all of the exported sessions together.
Session Import
Initiating Import
Importing a Session into ICE can be accomplished through several methods.
Via Main Menu:
Access the desktop main menu.
Navigate to
Session > Import Session.Browse to locate the desired .iceSession file.
Using Drag and Drop:
Simply drag the .iceSession file from Windows Explorer.
Drop it into the ICE Layer List panel.
Through Double Click:
Double-click an .iceSession file in Windows Explorer.
This action directly imports it into ICE.
Asset Handling
When importing a Session that has associated assets (like images or videos), these assets are imported into ICE using their existing file paths. It's crucial to store your Session folder in a logical and accessible location before importing to ensure smooth asset integration.
Post-Import Process
After the import is complete, ICE displays a dialog summarising the changes made during the import. This includes details of the Session and any associated assets that have been imported, allowing you to verify that the import process has completed successfully.
Import folder
Importing a folder allows multiple sessions which are contained within a folder to be imported at once.
Navigate to Session > Import Sessions
This will open a file browser, navigate to a folder containing sessions to initiate the batch import.