
Collection of (hopefully) useful recipes for making bits of Open Stage Control layouts. Feel free to ask if you need a hand, and add anything to this page that you think isn’t explained well by the Open Stage Control documentation.
Sending multiple OSC messages with one button
-
Create a button and set up as normal, other than the
oscsection of the inspector. -
Set
bypasstotruein theoscsection of the inspector to stop the button sending its default OSC messages. -
In the
onValuehandler, in thescriptingsection of the editor, use the send function to send as many OSC messages as required.-
The syntax looks like this:
send('<the ip address>:<the port>', '</the/osc/address>', 'all', 'the', 'arguments');(without<or>brackets) -
A variable,
valueis available, which is replaced with the button’s new value.
-
e.g:
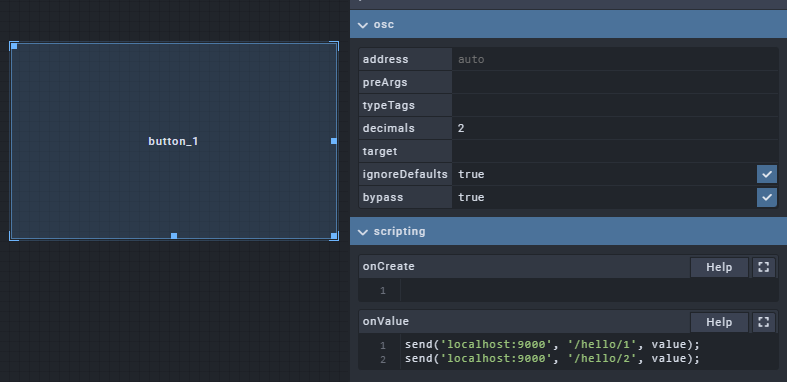
This sends /hello/1 and /hello/2 with the button’s new value as an argument to localhost:9000 whenever the button’s value changes.
Any other JavaScript can be used in this onValue property for basic logic, etc.
Feel free to ask if you’re doing something unusual.
References: https://openstagecontrol.ammd.net/docs/widgets/scripting/ , https://openstagecontrol.discourse.group/t/two-or-more-osc-address-on-a-toggle-button/178/6
Using image assets
You can use the image widget for this.
For example, to use an image on a button:
-
Create a
panelcontainer widget to group the button and image widgets. -
Within the panel, create
buttonandimagewidgets.-
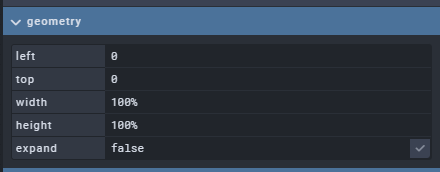
Set both of their
geometrysettings to fill their parent containers, as in the screenshot below. -
Make sure the button is on top of the image - i.e. above it in the project tree.
-
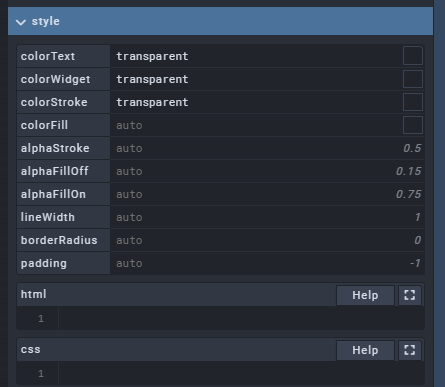
Style the button as required - it’s probably worth making the button mostly invisible, as in the screenshot below.
-
-
Set up the button’s OSC sending/behaviour as required.
-
Set the image’s
valueproperty in thevaluesection of the inspector to the desired image.-
The simplest way to do this is to convert the image to base64 using this utility: https://www.base64-image.de/. Upload an image, click “copy image”, and paste this into the the
valueproperty of the image component.
-
-
You should see the image appear after you click out of the
valueinput. -
Now clicking the image will actually click the button in front of it and send the required OSC.
You can follow similar steps to use an image elsewhere (without grouping it/creating the button etc.)
If we didn’t do the base64 conversion the image would have to be made accessible to the browser by the service, which is a bit annoying.
Alternate base64 conversion using WSL/bash: (echo "data:image/*;base64," && base64 [image file]) | tr --delete '\n' > a (without square brackets). Copy contents of new file 'a' into value property.
References: https://openstagecontrol.ammd.net/docs/customization/css-tips/, https://openstagecontrol.discourse.group/t/an-image-on-a-push-button/96
Controlling Igloo Core Engine via the Igloo Core Engine API
To interact with the Igloo Core Engine system through its API using OpenStageControl, follow these instructions:
1. API Key Initialisation:
-
Before you can send or receive any messages through the API, you first need to send a message containing your unique API key.
-
Locate your Igloo Core Engine API key:
-
Open Igloo Core Engine.
-
Navigate to:
Config > Activate. -
Within the activation window, you'll see your Igloo Core Engine license key.
-
Only send the last two segments of this key.
-
For example, if your license key is
XXXXXX-XXXXXX-XXXXXX-xxxxxx-09345D-0B7677, you'd send09345D-0B7677.
-
2. Setup OpenStageControl Custom Module:
-
OpenStageControl allows for the creation of custom modules that can automate message sending. To do this:
-
Locate
open-stage-control\ice.jsin the igloo-core-service install directory. (By default:C:\igloo\igloo-core-service\open-stage-control\). -
Replace the placeholder API key with your actual Igloo Core Engine API key from step 1.
-
// ice.js

const API_KEY = 'Enter your API key here';

module.exports = {
  init: () => {
    send('127.0.0.1', 10003, `/apikey?value=${API_KEY}`);
    app.on('sessionOpened', () => {
      send('127.0.0.1', 10003, `/apikey?value=${API_KEY}`);
    });
  },
};
3. Modify the Configuration File:
-
Locate the
config.jsonfile inC:\igloo\igloo-core-service\. -
Modify the file to include the
custom-moduleparameter as shown below -
Restart the igloo-core-service from windows services window.
  "openStageControl": {
    "launch": true,
    "port": 802,
    "theme": "C:\\igloo\\igloo-core-service\\open-stage-control\\igloo.css",
    "session": "C:\\igloo\\igloo-core-service\\open-stage-control\\default_session.json",
    "parameters": ["--custom-module", "C:\\igloo\\igloo-core-service\\open-stage-control\\ice.js"]
  },